Basic Planning and Preparation for a Re-Roofing Job
Plan the entire job in advance, always plan for 10% roofing materials waste in your calculations, and NEVER take any shortcuts to get the job done. The most important part of this project is SAFETY!!!

1. Whenever possible, have at least one person helping you! Just one body can make a huge difference in more efficient use of time, and wear and tear on your body. 😉 It’s also an element of safety, the importance of which cannot be overstated!
2. Before beginning, you need to be able to tell the type of a roof your house has. You need to know how to tell the difference between a hip vs. a gable roof. You also need to know if there are any dormers, or some other intersects and valleys on the roof.
3. Note how many vents and stacks are on your roof, and most importantly, you need to estimate your roof pitch. We’ll cover the most common roof types in the next section…
Now, you have a few decisions to make; decide on the type of shingle you want to install, pick a roofing shingle color, and decide whether you are going to tear off your old roof, or choose to re-roof over the existing shingles, instead.
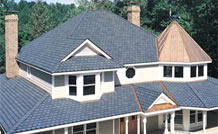 New Shingle Roof
$7,500 Average price |
 New Metal Roof
$14,500 Average price |
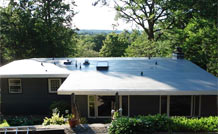 New Flat Roof
$8,225 Average price |
|
|
||
 See costs in your area
How to pick the right type and Color of Roofing Shingles
Start out by looking at your neighbors’ houses to get a feel for what types or roofs are installed in your neighborhood. That may help you with a color selection, and with choosing a shingle type for your area. Now, let’s start breaking all of this down so you can determine what you want, and need…
Roof Types:
There are many types of roof designs and styles. Below are descriptions of the most common roofs in use today. You may have a modified form of a one of these roofs. Read each description and see what type or combination of roof styles best describes your roof.
Gable:

This roof contains two sloping planes of equal pitch on both sides of the ridge. On the perpendicular ends there is a gable, which is the upper part of each sidewall that creates a triangular point at the ridge of the roof.
Hip:

This roof contains four sloping planes of the same pitch but not the same size. The front and back of the roof are usually the major slopes, and the two sides of the roof are the smaller planes. A hip roof does not have a gable.
Hip and Valley:
This roof is comprised of two or more hip roofs joined perpendicular to each other. This is what creates a valley, when two planes meet.
Gable and Valley:

This roof is created when another gable, or a hip roof intersects with the non-gable side(s) of a gable roof. These roofs are usually present due to an addition being added to a gable-type home.
Roof Shingle Types and Differences
There are mainly two styles of asphalt shingles you can use: a 3-tab or strip shingles, and architectural or dimensional shingles. Both are installed in a somewhat similar manner. The difference is in the visual style of shingles, and the number of layers/laminates that impact durability, longevity, and appearance..
3-tab shingles are a thick single layer of asphalt impregnated mat material pressed, and then coated with granules. This design allows them to lay very flat together giving the roof an almost smooth flat look.
Architectural (also known as dimensional) shingles are made by compressing and adhering multiple layers of asphalt mat material to a thick base. This design gives a shingle a fuller layered (or 3D) look, and makes the shingle more durable, and longer lasting. Architectural shingles have a 30-to-50-year warranty depending on the manufacturer, while a 3-tab usually carries a 20-year warranty.
Roofing Terms:
Bundle: A package of shingles. There are between 3-5 bundles of shingles per roof square.
Butt Edge: The lower edge of a tab on a shingle.
Closed Cut Valley: When the shingles from one side of the valley are laid across the valley while shingles from the opposite side are trimmed back approximately two inches from the center of the valley.
Collar (Vent Sleeve, or a Boot): Pre-formed flange made of neoprene rubber or aluminum, and designed to slide over a vent pipe to enclose the outer vent pipe opening.
Counter flashing: That portion of the flashing attached to a vertical surface to prevent water from migrating behind the base flashing.
Course: A row of shingles installed on the roof.
Cutout: The open strip sections tabs of the shingle.
Deck: The plywood surface that is attached to the rafters.
Dormer: A framed window gable that is installed in the roof slope. A dormer can also be the entire slope of the roof raised on the eave side up to a pitch of 2:12 off the ridge. This is done to turn an attic into a 2nd floor without actually tearing off the entire roof to build a true 2nd floor. You will mostly see this on a Cape Cod home.
Drip Edge: metal strip attached along the eaves and rakes to keep water from getting under the shingles and rotting the roof decking underneath.
Eaves: A horizontal area under the overhang from the rake leading back to the wall plate.
Fascia: A front strip where the roof edge and soffit meet. This is where a gutter is attached.
Flashing: Pieces of galvanized metal used to prevent water seepage of any roofing joints or items that come through the roof. Examples include roof valleys, vents, stacks, dormers, etc.
Flashing Cement: A petroleum-based sealer used to seal flashing inner and outer edges as well as nail heads.
Hip shingles: pre-made or custom cut standard shingles used to cover the joints of the roofs sloping planes.
Ice and Water Shield: Waterproof underlayment designed to protect against water being forced up under the shingle caused by ice damming and wind.
Lap: To overlay the next row of shingles on top of the previous row.
Lap cement: A petroleum-based adhesive used to seal overlapping edges of roll roofing.
Overhang: That section of the roof that extends over the exterior wall.
Pitch: Is the ratio between the rise and the span. It is measured in feet but stated in inches. Example: 4:12 is 12 inches of span (or run when measured to the ridge) will generate 4 inches of rise. 4:12 is the most common pitch used in standard roof design.
Rafter: Provides a framing support that a roof deck is secured to. Rafters run from the ridge to the wall plate. They usually have a 16 inch on center span between them.
Rake: An inclined edge of a sloped roof over a wall from the eave to the ridge. This is a gable side of the house.
Ridge: A peak of the roof where the two sloped planes meet at the top.
Ridge shingles: Shingles used to cover a horizontal external angle formed by the intersection of two sloping roof planes.
Rise: The distance from the top of the ridge straight down to the horizontal eaves line.
Roll roofing: (Also known as felt, felt paper, and underlayment) Asphalt impregnated material in roll form used to go between the deck and the shingle as an added layer of protection.
Run: A horizontal distance from the eaves to a point directly under the ridge. One half the span.
Self-sealing shingles: Shingles containing factory-applied strips or spots of self-sealing adhesive that bonds shingle courses together when exposed to the heat of the sun after application.
Soffit: A finished underside of the eaves.
Span: A horizontal distance from eaves to eaves.
Square: A unit of roof measure covering 100 square feet.
Starter strip: Asphalt roofing applied at the eaves. It provides protection by filling in the spaces under the cutouts and joints of the first course of shingles.
Tab: An exposed portion of strip shingles defined by cutouts.
Top lap: A portion of the shingles covered by the next course of shingles.
Valley: The joint created where two sloping roof planes come together providing a place for a water runoff.
Vent: Any outlet for air that penetrates through the roof such as a pipe or a stack. It can be any device installed on the roof slope, ridge, gable, or soffit for the purpose of providing ventilation to the underside of the roof deck. Terms you will hear are ridge vent, soffit vent, gable vent, and box vent.
Woven Valley: Shingles from both sides of the valley extend across the valley and are joined together by overlapping alternate courses of shingle during installation. This will completely cover the flashing installed in the valley.
Need a Roofer? Get 4 Free Quotes From Local Pros:
Enter Your Zip Code:
Tools of the Trade
When installing a new asphalt shingle roof, you really do not need any specialty tools to tear-off, and re-roof your home. However, the job will go much faster and easier, if you can rent, or borrow some of the power specialty tools.
Essentials:
- Flat shovel or pitchfork
- Pry bar
- Tin snips
- Roofing hammer
- Shingle knife and extra blades
- Staple gun
- Extension ladder
- Gloves
- Roof ladder and or safety harness with roof anchors
- Framing square
- Tape measure
- Chalk line
- Dumpster (2 yards. per 100 sq.ft.)
- 2“, 4“, 6“ putty knives
- Caulk gun
- Circular saw
- Drill
- Jig saw (or reciprocating saw)
Safety
Always keep your safety in mind. A 10-20 foot fall can be deadly!
Preferred Tools to have:
- Air nail Gun
- Pneumatic tear off shovel (manual tear off shovel at a minimum)
- Air compressor
- Tack hammer (instead of a staple gun)
Roofing Materials You will need
- Drip edge
- Waterproof underlayment (ice and water shield for cold weather areas)
- Roll roofing
- Rake edge flashing
- Valley flashing (if you have valleys)
- Stack flashing/boots
- Starter rolls
- Shingles (fiberglass asphalt shingles)
- Ridge vent (if not doing a box vent system)
- Soffit vents (if using the ridge and soffit vent system) Flashing cement
- Roofing nails
- Tacks or staples
- Box vents (If not doing a soffit and ridge vent system)
- Plywood (if deck repair is needed and to use to protect shrubbery)
- Large tarps to catch falling debris from the tear off
Old Roof Tear off

Metal Roofing
Flat Roof
$14,500
$8,225
Before starting your tear off, watch the weather reports. You should figure a two-person team can only tear off and replace about 250 square feet of roofing per day. Make sure you have enough tarps to cover exposed areas in the event it rains before you can paper over the exposed roof decking.
Make sure you have protected your shrubs by leaning plywood on a diagonal against the house over the shrubs. Also, place the dumpster as close to your main work area as possible. This will allow you to use a tarp, or a piece of plywood as a slide to drop your waste directly into the dumpster. For easier yard cleanup, lay tarps on the ground to catch the fallen material.
Fascia inspection, check for rot, or other damage that could weaken the boards. Remove the gutters if the fascia needs to be replaced.
Using pry bars, remove the ridge vent (if present). If no ridge vent is present, use your shovel to remove the shingle cap on the ridge.
Starting at the ridge, use your shovel to pry off old shingles. Do this by sliding hard under the layers of shingle and paper, then pry upward. Start at the end and move in and down. Remove small sections at a time and gather the loose material to throw in the dumpster. Avoid just pushing all the old roofing into the yard as this could cause damage to the house and yard despite the covering. This also makes cleanup much more difficult.
Use the shovel or pry bars to remove drip edge flashing from the eaves and rake. Remove the flashing from chimneys, valleys, and stacks. Remove the old box vents and flashing surrounding them (if present).
Once complete, do a complete walk through, and remove all remaining pieces of shingle, paper, and roofing nails. The surface needs to be completely free of all protrusions to prevent damage to new roofing.
Deck Inspection/Repair
Now that your roof is stripped, it’s time to inspect for any damage to the decking. It’s very important to have a solid deck free of rot, sags, and making sure that deck’s sheeting is firmly secured to the rafters. When inspecting the decking, check all wood from the attic as well as from the top.
Cut all damaged decking with a circular saw, setting the blade 1/16” deeper than the deck material. You want to cut the deck, but you must do it ever-so-carefully as not to damage the rafters underneath. Rafters are made from dimensional lumber (2” x6”, 2” x 8”). The thickness of the rafter is actually 1 1/2”, so when cutting to the rafter, you will cut over the rafter 3/4”. This is called cutting on center.
After cutting out the rotted piece, install a cross member of the same size dimensional lumber as your rafter. You will place one cross member 3/4” under the existing decking on both the ridge and eave side. Now you have four solid surfaces to nail your replacement piece of decking. Secure using 8D nails spaced no more than 6” apart.
Once all rotted decking is replaced, do a close inspection for decking and deck nails coming loose. Pound all loose nails back into the deck and add 8 D nails for loose decking. Make sure all decking has nails every 6”. Any piece of decking that won’t hold a nail must be replace, as the wood it rotted from the inside or is too warped to be drawn in.
Roofing Shingles Installation:
Start by applying the drip edge to the eaves of your roof. If your eave is one straight length, then pick an end, and work to the other. Use a roofing nail (1”) to tack the drip edge down, one every 10” When placing two pieces of drip edge together, overlap one end over the other by 1” and secure using two roofing nails, one in the back, and one in the front. Make sure when driving the nails, you also flatten the flashing as flat as possible.
Next, install the ice-and-water shield to the following areas: eaves valleys, box vent holes, stacks, chimney’s, dormers, and ridge areas.
Check your local building codes for proper coverage. Some building codes require for eave coverage, a distance of two feet up the roof from the outer wall, other codes may require 3 or more feet from the outer wall. So, if we are using the 2′, and you have a one-foot overhang, you will have to cover the first three feet of decking with ice-and-water shield. Ice-and-water-shield is a self-stick waterproof membrane. Once it makes contact, it is nearly impossible to pull it back up to adjust.
Make sure you have your alignment before peeling away the backing and placing it on the decking. Staring on the overhang, you will use your eave as a guide to make the row(s) straight. Make sure you cover your drip edge and Install per manufactures instructions. When installing around a chimney, make sure your ice and water shield goes up the chimney 12”.

Apply underlayment / roofing felt paper to the deck. Do not apply a roof underlayment over the ice-and-water shield directly, unless required by the local building code. Start at the eave area just over the ice-and-water shield, with three inches of overlap (about 3”) and work your way up. Make sure you keep this first row straight, using the ice and water shield as a guide. When installing the paper, you will overlap the felt paper per local building code (Usually 2”- 4”). Most paper is marked for overlapping to help keep your rows straight.

Now you will install the rake side (gable side) drip edge. Overlap the eave drip edge by about 1/2” cutting the 90-degree angle between the top and side, so you can roll over the rake drip edge at the corners. This will make your drip edge neat and secure. Only the shingles will go over the rake drip edge, as explained later.

Install new box vents if applicable. Apply a bead of caulk around the entire flange base of the vent. Set the box vent over the vent hole, making sure you are centered to the hole. Press the entire flange firmly to create a good seal. Nail all four corners and the middle of each side of the flange. Apply flashing cement to the entire outer seam and all nails.
Now install your stack vent flashing and boot. Many boots are a one-piece unit that include the flashing and boot put together. Slide the boot over the stack and slide down for proper fit. Slide the boot back up and apply flashing cement to the top half of the decking only.
Slide the boot back down and secure with roofing nails on the top edge and one in each of the middle of each side. You need to leave the bottom loose to install shingle underneath the flashing. The shingles will install over the flashing on the top and middle.
You are now ready to install the shingles. Start by measuring up the eave the length of a starter shingle and place multiple marks on the roof. Take your chalk line from one end to the other and snap a line. This line is where you will set the top side of the starter row.
Make sure the starter row covers the drip edge completely. If it does not, re-measure and snap a new line, plying the starter row along the eaves. The starter row creates a seal for the first row of shingles. It is imperative that you keep the starter row square to the roof.

Choose an outer edge to begin laying your shingles. You will completely cover the starter row with roofing shingles and create an 1/8” lip over the rack edge. When laying your shingles, butt them tight against each other as you move down a row. Place a nail at each end of the shingle about 1” in from the end, then two inner nails spaced evenly apart. The shingles should have a nail guide imprinted on them to show a nail placement.
Full shingles must have a minimum of 4 nails (more for high-wind areas), and nothing less than two for partial pieces. When installing your roofing shingles, you need to lay them in a stair type / diagonal pattern. The rows need to offset to prevent leaking. To create an offset, leave the first shingle on the first-row, whole/uncut.
For the second row, cut 6 inches off the end of the shingle, then 12 inches off the third row, and so on. When moving up to the next row, place the shingle at the overlay mark on the lower shingle. Read the manufacturers installation instructions for proper overlap method.
If you have a valley to shingle, make sure you started your shingles away from the valley, working toward the valley on the lower side of the valley only. From the side you are currently working on, place shingles over the valley making sure they extend at least 12″ on the other side.
As on the other shingles, use 4 roofing nails on each shingle. When nailing the shingle, do not place any nails closer than 6″ from the valley center. You may want to lay a shingle, find where it sits in the valley and give it a small bend, so the shingle sits firmly in the crease. Press tightly in the valley to prevent bridging and do not use any nails within 6 inches of the center of the valley.

Build your shingles up to the highest part of the valley at the ridge. Using your chalk line, snap a line down the center of the valley. This will provide a cutting guide for the shingles you will place on the other side of the valley.
Move to the other section of the roof, then start laying shingles just like you did on the other section of roof. Laying shingles over the starter row and working up. When you get to the valley, cut the shingles along the chalk line. It is best placing metal flashing or a scrap piece of wood under the shingle you will be cutting, as not to cut the shingle underneath.
Apply roofing cement to the underside of each cut shingle in the valley center. This will serve as a water barrier. Press firmly to create a good seal with the shingle and the cement, then nail the shingle in place. Again, do NOT set a nail any closer than 6″ from the valley center.
Applying the roof cap is the next step. You have the choice of purchasing cap shingles or cutting your own out of standard shingles. To cut your own, just cut down multi-flap shingles into individual shingles. Cut the shingles so that both edges of the upper overlap part have an inward angle.
Place the first shingle end flush to the edge of the roof.
Nail each side of the shingle to each side of the ridge, just below the shingles self-sealing strip. Install the next shingle approximately 2″-3″ past the seal strip of the first shingle. Keep this up until you reach the other end of the peak. Your last shingle is an exposed shingle.
Take your shingle knife and cut the overlap part of a cap shingle so that there’s just half of a shingle. Use this piece to cover the overlap part of the last exposed shingle. Place one nail on either side of the ridge then seal the exposed nails with cement.
Final Thoughts
Shingles are not meant for roofs with less than a 2:12 pitch. If you have a shallow pitch or a flat roof, this is not for you. Make sure you seal every joint and seam, as a bit of extra work now will save you a lot of work and money down the road.
It is always better to do roofing in warm or hot weather. Shingles have a self-adhesive strip to allow them to bond with each other. It’s the sun’s heat that makes this bond happen. Always check your local building codes for specifications and permit requirements.
Check with your homeowner’s insurance agent to see if they offer a discount for additional securing of the decking. By adding extra nails, it could help you save a few dollars off your premium. Good preparation is key to doing a good job in a nice and easy manner! 😉
Need a Roofer? Get 4 Free Quotes From Local Pros:
Enter Your Zip Code:
My parents thought about doing their roof themselves last summer, and this would include me because I live close by. The idea of that really scared me because we know nothing about it, plus it would have taken a long time. After reading this, I realize there is a lot more to roofing than I thought. Thanks for the info.