Basic Planning and Preparation for a Re-Roofing Job
Plan the entire job in advance, always plan for 10% roofing materials waste in your calculations, and NEVER take any shortcuts to get the job done. The most important part of this project is SAFETY!!!

1. Whenever possible, have at least one person helping you! Just one body can make a huge difference in more efficient use of time, and wear and tear on your body. 😉 It’s also an element of safety, the importance of which cannot be overstated!
2. Before beginning, you need to be able to tell the type of a roof your house has. You need to know how to tell the difference between a hip vs. a gable roof. You also need to know if there are any dormers, or some other intersects and valleys on the roof.
3. Note how many vents and stacks are on your roof, and most importantly, you need to estimate your roof pitch. We’ll cover the most common roof types in the next section…
Now, you have a few decisions to make; decide on the type of shingle you want to install, pick a roofing shingle color, and decide whether you are going to tear off your old roof, or choose to re-roof over the existing shingles, instead.
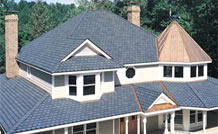 New Shingle Roof
$7,500 Average price |
 New Metal Roof
$14,500 Average price |
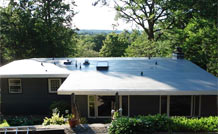 New Flat Roof
$8,225 Average price |
|
|
||
 See costs in your area
How to pick the right type and Color of Roofing Shingles
Start out by looking at your neighbors’ houses to get a feel for what types or roofs are installed in your neighborhood. That may help you with a color selection, and with choosing a shingle type for your area. Now, let’s start breaking all of this down so you can determine what you want, and need…
Roof Types:
There are many types of roof designs and styles. Below are descriptions of the most common roofs in use today. You may have a modified form of a one of these roofs. Read each description and see what type or combination of roof styles best describes your roof.
Gable:

This roof contains two sloping planes of equal pitch on both sides of the ridge. On the perpendicular ends there is a gable, which is the upper part of each sidewall that creates a triangular point at the ridge of the roof.
Hip:

This roof contains four sloping planes of the same pitch but not the same size. The front and back of the roof are usually the major slopes, and the two sides of the roof are the smaller planes. A hip roof does not have a gable.
Hip and Valley:
This roof is comprised of two or more hip roofs joined perpendicular to each other. This is what creates a valley, when two planes meet.
Gable and Valley:

This roof is created when another gable, or a hip roof intersects with the non-gable side(s) of a gable roof. These roofs are usually present due to an addition being added to a gable-type home.
Roof Shingle Types and Differences
There are mainly two styles of asphalt shingles you can use: a 3-tab or strip shingles, and architectural or dimensional shingles. Both are installed in a somewhat similar manner. The difference is in the visual style of shingles, and the number of layers/laminates that impact durability, longevity, and appearance..
3-tab shingles are a thick single layer of asphalt impregnated mat material pressed, and then coated with granules. This design allows them to lay very flat together giving the roof an almost smooth flat look.
Architectural (also known as dimensional) shingles are made by compressing and adhering multiple layers of asphalt mat material to a thick base. This design gives a shingle a fuller layered (or 3D) look, and makes the shingle more durable, and longer lasting. Architectural shingles have a 30-to-50-year warranty depending on the manufacturer, while a 3-tab usually carries a 20-year warranty.
Roofing Terms:
Bundle: A package of shingles. There are between 3-5 bundles of shingles per roof square.
Butt Edge: The lower edge of a tab on a shingle.
Closed Cut Valley: When the shingles from one side of the valley are laid across the valley while shingles from the opposite side are trimmed back approximately two inches from the center of the valley.
Collar (Vent Sleeve, or a Boot): Pre-formed flange made of neoprene rubber or aluminum, and designed to slide over a vent pipe to enclose the outer vent pipe opening.
Counter flashing: That portion of the flashing attached to a vertical surface to prevent water from migrating behind the base flashing.
Course: A row of shingles installed on the roof.
Cutout: The open strip sections tabs of the shingle.
Deck: The plywood surface that is attached to the rafters.
Dormer: A framed window gable that is installed in the roof slope. A dormer can also be the entire slope of the roof raised on the eave side up to a pitch of 2:12 off the ridge. This is done to turn an attic into a 2nd floor without actually tearing off the entire roof to build a true 2nd floor. You will mostly see this on a Cape Cod home.
Drip Edge: metal strip attached along the eaves and rakes to keep water from getting under the shingles and rotting the roof decking underneath.
Eaves: A horizontal area under the overhang from the rake leading back to the wall plate.
Fascia: A front strip where the roof edge and soffit meet. This is where a gutter is attached.
Flashing: Pieces of galvanized metal used to prevent water seepage of any roofing joints or items that come through the roof. Examples include roof valleys, vents, stacks, dormers, etc.
Flashing Cement: A petroleum-based sealer used to seal flashing inner and outer edges as well as nail heads.
Hip shingles: pre-made or custom cut standard shingles used to cover the joints of the roofs sloping planes.
Ice and Water Shield: Waterproof underlayment designed to protect against water being forced up under the shingle caused by ice damming and wind.
Lap: To overlay the next row of shingles on top of the previous row.
Lap cement: A petroleum-based adhesive used to seal overlapping edges of roll roofing.
Overhang: That section of the roof that extends over the exterior wall.
Pitch: Is the ratio between the rise and the span. It is measured in feet but stated in inches. Example: 4:12 is 12 inches of span (or run when measured to the ridge) will generate 4 inches of rise. 4:12 is the most common pitch used in standard roof design.
Rafter: Provides a framing support that a roof deck is secured to. Rafters run from the ridge to the wall plate. They usually have a 16 inch on center span between them.
Rake: An inclined edge of a sloped roof over a wall from the eave to the ridge. This is a gable side of the house.
Ridge: A peak of the roof where the two sloped planes meet at the top.
Ridge shingles: Shingles used to cover a horizontal external angle formed by the intersection of two sloping roof planes.
Rise: The distance from the top of the ridge straight down to the horizontal eaves line.
Roll roofing: (Also known as felt, felt paper, and underlayment) Asphalt impregnated material in roll form used to go between the deck and the shingle as an added layer of protection.
Run: A horizontal distance from the eaves to a point directly under the ridge. One half the span.
Self-sealing shingles: Shingles containing factory-applied strips or spots of self-sealing adhesive that bonds shingle courses together when exposed to the heat of the sun after application.
Soffit: A finished underside of the eaves.
Span: A horizontal distance from eaves to eaves.
Square: A unit of roof measure covering 100 square feet.
Starter strip: Asphalt roofing applied at the eaves. It provides protection by filling in the spaces under the cutouts and joints of the first course of shingles.
Tab: An exposed portion of strip shingles defined by cutouts.
Top lap: A portion of the shingles covered by the next course of shingles.
Valley: The joint created where two sloping roof planes come together providing a place for a water runoff.
Vent: Any outlet for air that penetrates through the roof such as a pipe or a stack. It can be any device installed on the roof slope, ridge, gable, or soffit for the purpose of providing ventilation to the underside of the roof deck. Terms you will hear are ridge vent, soffit vent, gable vent, and box vent.
Woven Valley: Shingles from both sides of the valley extend across the valley and are joined together by overlapping alternate courses of shingle during installation. This will completely cover the flashing installed in the valley.
Need a Roofer? Get 4 Free Quotes From Local Pros:
Enter Your Zip Code:
Tools of the Trade
When installing a new asphalt shingle roof, you really do not need any specialty tools to tear-off, and re-roof your home. However, the job will go much faster and easier, if you can rent, or borrow some of the power specialty tools.
Essentials:
- Flat shovel or pitchfork
- Pry bar
- Tin snips
- Roofing hammer
- Shingle knife and extra blades
- Staple gun
- Extension ladder
- Gloves
- Roof ladder and or safety harness with roof anchors
- Framing square
- Tape measure
- Chalk line
- Dumpster (2 yards. per 100 sq.ft.)
- 2“, 4“, 6“ putty knives
- Caulk gun
- Circular saw
- Drill
- Jig saw (or reciprocating saw)


